Testing and Deploying Smart Contracts with Remix
In my post Building Decentralized Apps With Ethereum and JavaScript, I showed how to write a front end for a smart contract that was already deployed to the Ethereum network. This post will cover how that smart contract got deployed. I’ll walk you through compiling a smart contract, doing some basic testing, and deploying it to the world.
There are a number of tools available for compiling, testing, and deploying smart contracts. For this post, I’ll use Remix, which has the advantage of being entirely browser-based. This means you’ll be able to compile, deploy, and test smart contracts without installing any local tools.
Compiling a Smart Contract
In our last blog post, we wrote a simple contract called Counter, which we’ll use again here:
pragma solidity ^0.4.17;

contract Counter {
    uint256 count;  // persistent contract storage

    function Counter(uint256 _count) public {
        count = _count;
    }

    function increment() public {
        count += 1;
    }

    function getCount() public view returns (uint256) {
        return count;
    }
}
We can compile this contract by pasting it into the editor at remix.ethereum.org.1 By default, Remix automatically compiles your code when it changes, but you can also do it manually by clicking the button labeled “Start to compile” on the right. If the compiler emits an error or warning, you will see that on the right-hand side.
Deploying and Testing a Smart Contract
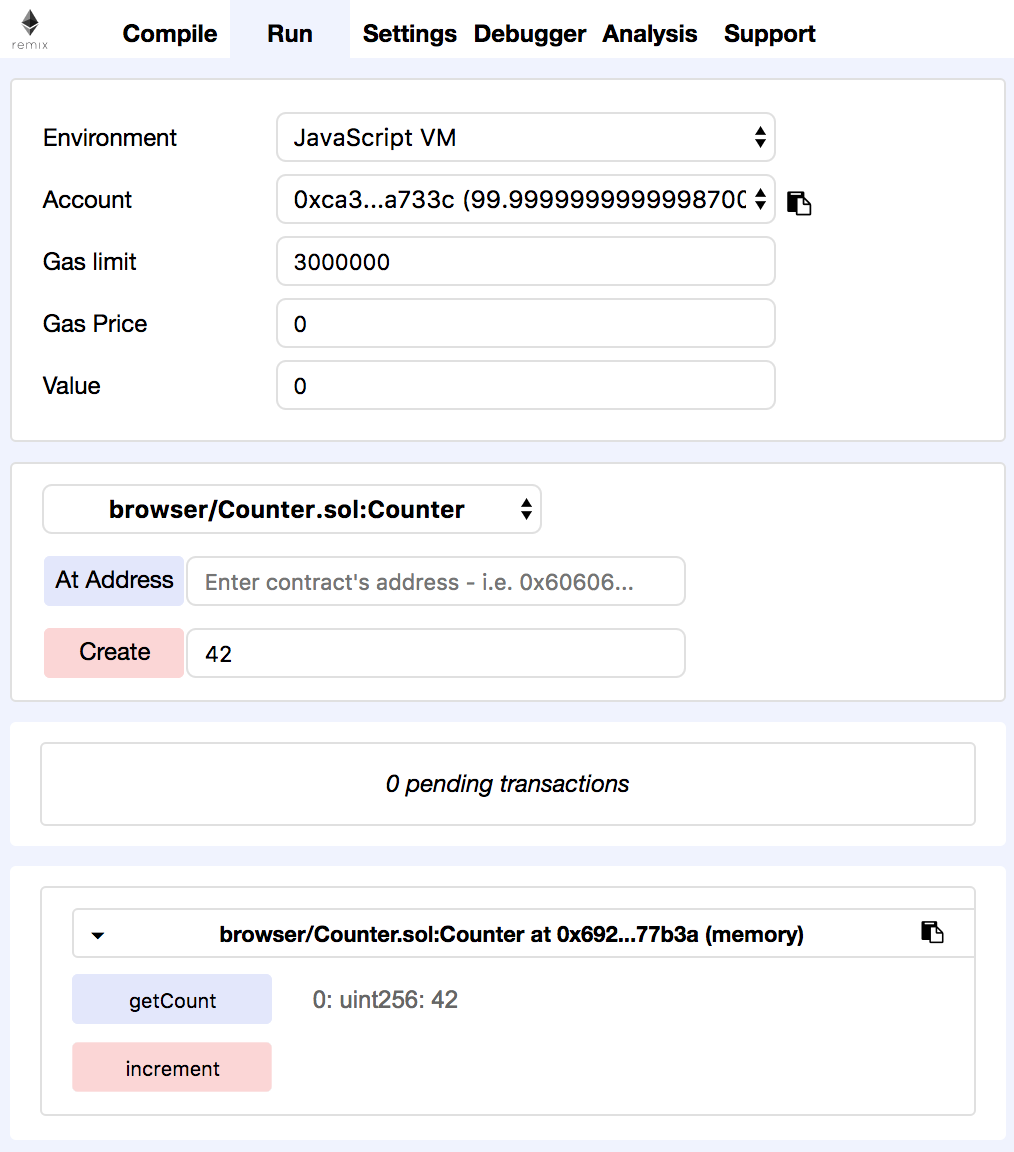
Once you’ve compiled a contract in Remix, you can use the “run” tab to deploy it. The “environment” drop-down gives three options for where to deploy the contract:
- JavaScript VM - This lets you run your contract directly in the browser using a JavaScript implementation of the Ethereum virtual machine (EVM). This is great for simple testing but doesn’t allow anyone else to interact with your contract.
- Injected Web3 - Web3 is the interface for interacting with an Ethereum node.2 If you’re using the MetaMask browser extension as described in our post about DApps, it injects an implementation of Web3 into every web page. This option will let you use that injected implementation to deploy to a test network or the main Ethereum network.
- Web3 Provider - This option connects directly to an Ethereum node via HTTP. If you’re running your own node (or something like ganache), you can use this option to connect to it.
For your initial development and testing, the JavaScript VM does everything you’ll need. When it’s time to deploy your contract to the world, you’ll need to use one of the other options.
Pick the JavaScript VM environment, enter an initial count next to the “Create” button, and then click “Create” to deploy the contract. You should see a line appear like browser/Counter.sol:Counter at 0x.... This indicates that your contract was deployed and has an address. Below that line, a list of public functions will appear. You can call a function by clicking on it. This allows for some basic in-browser testing.
Sharing Your Deployed Contract with Others
For someone to interact with your contract, they need to know two things:
- The address of the deployed contract.
- The contract’s Application Binary Interface (ABI).
You’ll get an address when you deploy your contract to a public network–either a test network or the main Ethereum network. When using Remix, a good way to do that is to deploy using MetaMask by choosing the “Injected Web3” environment.
The line that appears when your contract has been deployed has a clipboard icon on the right. (You may need to expand the right-hand panel to make that icon visible.) Clicking that icon will copy the contract’s address to your clipboard. Here’s an address where I deployed the above contract on the Ropsten test network3:
0xf15090c01bec877a122b567e5552504e5fd22b79
The ABI is what tells callers what functions are available, what arguments they take, and what they return. The ABI is generated for you by the Solidity compiler, and Remix exposes it from the “Compile” tab. Click “Details” next to your contract, and then click the clipboard icon next to “INTERFACE - ABI” to copy the interface to your clipboard. The ABI should be something like this (formatted for readability):
[
  {
    "constant": true,
    "inputs": [],
    "name": "getCount",
    "outputs": [
      {
        "name": "",
        "type": "uint256"
      }
    ],
    "payable": false,
    "stateMutability": "view",
    "type": "function"
  },
  {
    "constant": false,
    "inputs": [],
    "name": "increment",
    "outputs": [],
    "payable": false,
    "stateMutability": "nonpayable",
    "type": "function"
  },
  {
    "inputs": [
      {
        "name": "_count",
        "type": "uint256"
      }
    ],
    "payable": false,
    "stateMutability": "nonpayable",
    "type": "constructor"
  }
]
Summary
- Remix is a browser-based development tool for smart contracts.
- Remix supports compiling smart contracts in the browser.
- Remix provides a JavaScript implementation of the Ethereum virtual machine which can be used for simple testing.
- Remix can also deploy to a test network or the main Ethereum network.
- Remix exports your contract’s Application Binary Interface, which is consumed by code that interacts with your contract.
- The first time you use Remix, it populates the editor with an example contract. You can simply replace that code, or you can delete that file altogether and add a new one. ↩
- The Ethereum network is made up of “nodes” which store and update the blockchain via a consensus protocol. All interactions with the blockchain involve communicating with one of these nodes. ↩
- To deploy to the Ropsten test network, you’ll need ether in an account there to pay for gas. Ether on a test network has no real monetary value because it’s extremely easy to mine. You can fund your Ropsten account for free via the MetaMask faucet. ↩