End to End: Initial Coin Offering
In this post, I’ll walk through the end-to-end process of deploying a new ERC20-compatible token, a token sale contract to sell it, and a website to help users buy the token.
This post will tie together many concepts from earlier posts. I will link to those posts throughout. If you would like to see the running ICO example, you can check it out here.
Architecture
An initial coin offering (ICO) can be structured in a number of ways. Here, I’ll focus on the common scenario of selling a limited supply of an Ethereum-based token via a website for a fixed price.
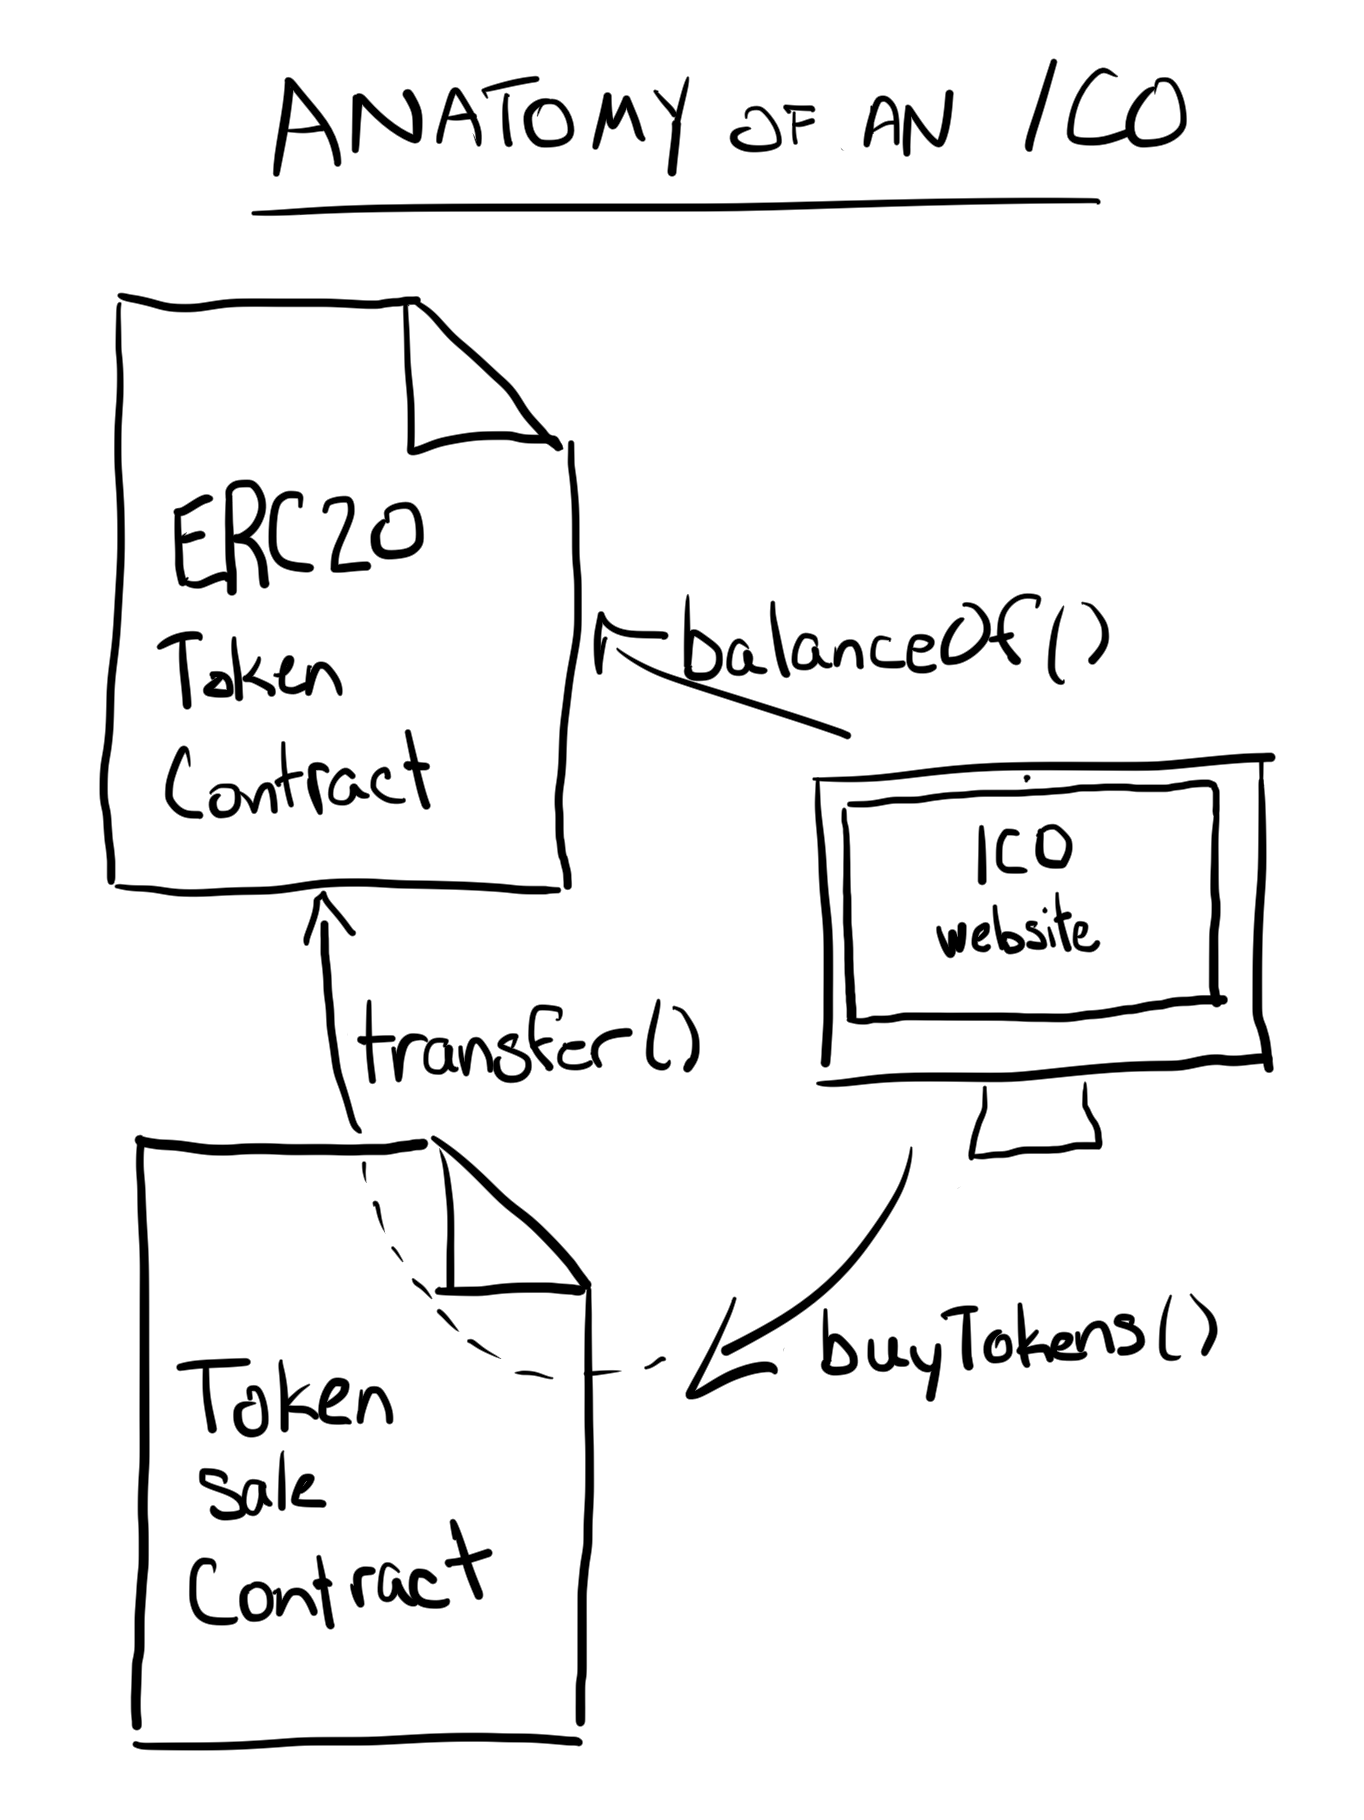
This kind of ICO can be decomposed into three components:
- An ERC20-compatible token that is to be sold.
- A token sale contract that will exchanges tokens for ether.
- A front-end website that displays the progress of the ICO and allows users to make purchases.
Deploying the Smart Contracts
For the ERC20-compatible token, I’m using the SimpleERC20Token contract from our post “Writing an ERC20 Token Contract”. To sell the token, I’m using the TokenSale contract from our post “Writing a Token Sale Contract”.
As described in our post “Testing and Deploying Smart Contracts with Remix”, I used Remix and MetaMask to take the following steps on the Ropsten test network:
- Deploy the
SimpleERC20Tokencontract. At this point, my account owns the total supply of tokens. - Deploy the
TokenSalecontract, supplying the constructor arguments"0x<address of SimpleERCToken>", 100000000000000. The latter is the price of each token: 0.0001 ether expressed in wei. - Transfer tokens from my account to
TokenSaleby callingtransferwith the arguments"0x<address of TokenSale>", 1000000000000000000000000. The latter is the total supply of tokens: 1,000,000 multiplied by 1018 because the token uses 18 decimal places.
Publishing the Contract Source Code
As described in our post “Verifying Contract Source Code”, it’s important to publish verifiable source code for smart contracts. Following this process, I published source code for both smart contracts on Etherscan:
Building the User Interface
With the two contracts deployed and the source code published, anyone can buy tokens by using a tool like MyEtherWallet or by writing code. This is, however, a very inconvenient way to interact with a smart contract. In our post “Building Decentralized Apps With Ethereum and JavaScript”, I described how web-based UI can help users work with smart contracts. If you haven’t already read that post, I strongly suggest doing so now, as the rest of this post will lean heavily on that material.
Buying Tokens
The most important piece of functionality in an ICO interface is the ability to buy tokens. In the UI I designed, this consists of a text box where the user can enter a number of tokens to buy and a button labeled “Buy Tokens.” When the button is pressed, the following code is executed:
$('#buyForm').submit(function (e) {
  // Prevent the browser from POSTing the form.
  e.preventDefault();

  var numberOfTokens = web3.toBigNumber($('#number').val());
  saleContract.buyTokens.sendTransaction(numberOfTokens, {
    value: numberOfTokens.mul(price),
  }, function () {
    // Nothing to do here. If the transaction is successful, it will trigger
    // events that we're already monitoring.
  });
});
There are two things to note in the above code:
- As a best practice, I try to always represent numbers as
BigNumbers. This is how values from the blockchain are returned, and it protects against JavaScript’s limitations around number values. - The result of sending the transaction is ignored. As I’ll explain later in this post, UI updates are triggered by events, and a successful transaction will log such an event. A failed transaction requires no UI update.
Displaying Information
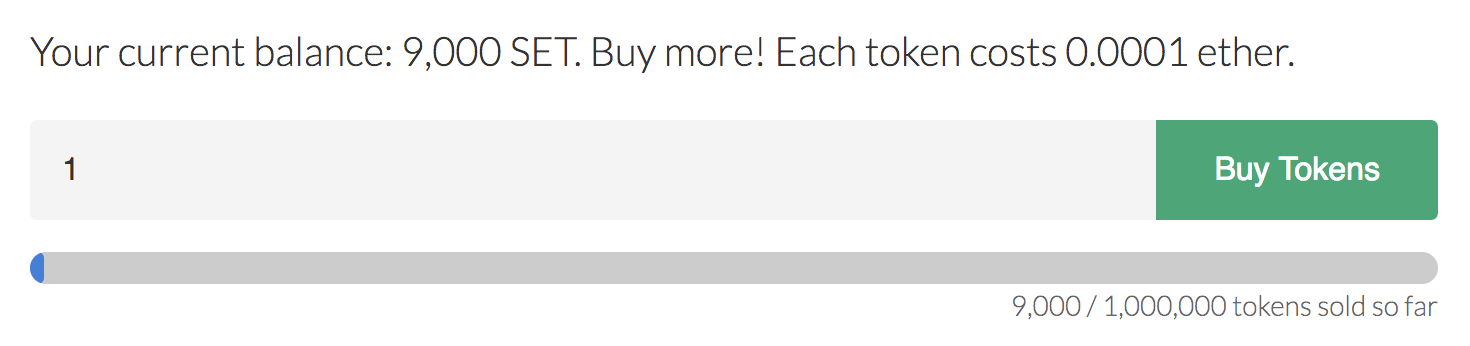
In addition to purchasing tokens, a good ICO interface will also show information about the state of the token sale as well as the user’s token balance. My example interface displays the following information:
- The user’s current balance. This is provided by the token contract’s
balanceOffunction, passing the user’s account as the sole argument. - The number of tokens remaining to be sold. This is again provided by the token contract’s
balanceOffunction, this time passing in the sale contract’s address. - The number of tokens that have already been sold. This is provided by the sale contract’s
tokensSoldfunction.
This function collects all the required data:
function loadData(blockNumber) {
  log("Loading data from contracts...")

  var balance, sold, remaining;

  // Callback that waits for all three pieces of data before proceeding
  function updateWhenDone() {
    if (balance !== undefined && sold !== undefined &&
        remaining !== undefined) {
      log("Updating UI.");
      updateUI(balance.div(10**decimals), sold, remaining.div(10**decimals));
    }
  }

  // Fetch in parallel
  // User's balance
  tokenContract.balanceOf.call(web3.eth.defaultAccount, {}, blockNumber,
    function (err, _balance) {
      if (err) return error(err);
      balance = _balance;
      updateWhenDone();
    });
  // Tokens sold so far
  saleContract.tokensSold.call({}, blockNumber,
    function (err, _sold) {
      if (err) return error(err);
      sold = _sold;
      updateWhenDone();
    });
  // Remaining inventory (sale contract's balance)
  tokenContract.balanceOf.call(saleAddress, {}, blockNumber,
    function (err, _remaining) {
      if (err) return error(err);
      remaining = _remaining;
      updateWhenDone();
    });
}
Here’s a brief explanation of the above code:
- Each
callspecifies a block number. By default, acalluses state from the latest block. When fetching multiple pieces of data, specifying a particular block number ensures that all the data comes from the same point in time. - The
calls to the blockchain are issued in parallel. All of them invoke the same callback, which waits until all of the data has been collected before it callsupdateUI. Just as with the previous point, updating the UI all at once helps to make sure users never see mismatched data from multiple blocks. - Because token amounts are scaled according to the number of decimals a token uses, it’s important to divide by 10decimals before displaying a number to a user.
Watching for Changes
The information displayed by the ICO can change for a number of reasons:
- Transferring tokens into the token sale contract increases the number of available tokens for sale.
- Someone buying tokens increases the number of tokens sold so far and decreases the number of tokens remaining for sale.
- Unrelated transfers in and out of the user’s account change the account’s token balance.
The UI is kept up to date by watching events, as described in our post “Logging and Watching Solidity Events”.
function initialize() {
  web3.eth.getBlockNumber(function (err, lastSeenBlock) {
    // Load data for the initial block
    loadData(lastSeenBlock);

    // Handler for events that necessitate a UI update
    function changeHandler(err, data) {
      if (err) return error(err);

      // Only if we haven't already fetched data for this block
      if (data.blockNumber > lastSeenBlock) {
        lastSeenBlock = data.blockNumber;
        loadData(lastSeenBlock);
      }
    }

    // The Sold event tells us when the number of sold tokens changes.
    saleContract.Sold(changeHandler);

    // We display the user's balance as well as the sale contract's
    // balance, so we need to monitor transfers to both.
    tokenContract.Transfer({
      to: [ saleAddress, web3.eth.defaultAccount ]
    }, changeHandler);

    // To display an accurate balance, we also need to monitor transfers out
    // of the user's account.
    tokenContract.Transfer({
      from: web3.eth.defaultAccount
    }, changeHandler);
  });
}
Here’s a brief explanation of the above code:
- This code is executed once on page load.
web3.eth.getBlockNumberis used to find the latest block number. Data is loaded from that block.- New data is only loaded if an event occurs in a block that hasn’t been seen yet. This is tracked in the
lastSeenBlockvariable. Transferevents have indexed parameters, so they can be efficiently filtered. An array as a filter value means a logical “or,” so the firstTransferfilter will match anyTransferevent that has atoargument of the sale address or the user’s account.
Handling Account Switches
Neither MetaMask nor web3.js provide an easy way to respond to the user switching accounts, but it can be important to do so. In this ICO example, information on the page pertains to a specific account, and it is updated in response to events targeting that account. If the user switches to use a different account, the UI should update accordingly.
The following code handles this situation in the ICO example app:
var initialAccount = web3.eth.defaultAccount;
window.setInterval(function () {
  if (web3.eth.defaultAccount !== initialAccount) {
    window.location.reload();
  }
}, 500);
This code checks which account is active every 500 milliseconds. If the active account changes, it simply reloads the page. A more sophisticated approach would be to reset the UI and stop all event listeners, but here the simple approach suffices.
Try the Demo
You can try the demo here. You’ll need MetaMask (or something else that injects web3.js) and an account with funds on the Ropsten test network. If you’d like to see the full source code for the front end, view the source of that page.
Summary
- An initial coin offering typically uses two smart contracts: an ERC20-compatible token and a token sale contract.
- Like all DApps, an ICO app has a front end written in HTML and JavaScript that uses
web3.jsto make calls to the blockchain. - When displaying multiple, connected pieces of data, care should be taken to retrieve all data from the same block and to update the UI atomically.
- To avoid repeated work, multiple events triggered in the same block can be consolidated into a single data fetch.